Category Archives: Software

About software

How to speed up Vista instantly

How to speed up Vista instantly

If you’re using Vista, you may have noticed how heavy it is in hardware-resource terms.

If you’d like a faster computer and are prepared to compromise on the aesthetics, here is a very simple and quick way to get things moving more quickly. This method will also give you the reassurance of knowing that you can undo any changes you make by following the same instructions:

  1. Click on the windows button at the bottom left of the screen
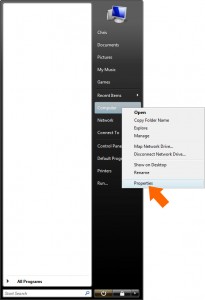
  2. Right-click on ‘Computer’ in the right-hand column on the start menu
  3. Select ‘properties’ from the new pop-up menu

    Click the Windows button then right-click 'Computer' and select 'properties'

    Click the Windows button then right-click 'Computer' and select 'properties'

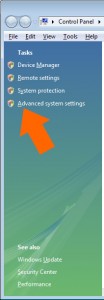
  4. From the new ‘system’ window select ‘advanced system settings’ from the left-hand column

    Select advanced settings from the left-hand column

    Select advanced settings from the left-hand column

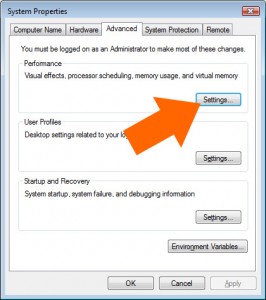
  5. From the new system properties window select the third tab labelled ‘Advanced’

    From the new system properties window select the third tab labelled ‘Advanced’. Select the ‘settings’ button under ‘performance’

    From the new system properties window select the third tab labelled ‘Advanced’. Select the ‘settings’ button under ‘performance’

  6. Select the ‘settings’ button under ‘performance’
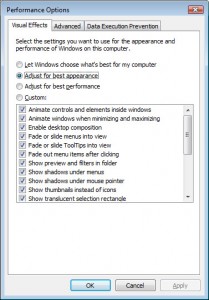
  7. From the new window, under the ‘visual effects’ tab, you now have the options to:
  • ‘Let Windows choose what is best for my computer
  • ‘Adjust for best appearance’
  • ‘Adjust for best performance’
  • Or select the options individually yourself (‘Custom’)
Choose your performance options

Choose your performance options

Select the ‘Adjust for best performance’ then click OK. This may take a few moments while your computer applies the new settings. To revert to the original or default settings, follow the same instructions above but choose option ‘b’ in step 7

A very simple guide to email on your portable devices (blackberry, iPhone, netbook etc.)

Many people have asked recently about using their email on their portable devices and it’s actually quite simple once you understand a few of the main principles

Here’s how seven Creative’s email system works

Firstly, a few definitions:

  • Local email client – this is an application on your home or office computer for reading and sending emails. Common local email clients are Outlook and Thunderbird
  • Remote web-server – this is your web-mail account and is accessed through your web browser. Your received emails are stored here until you collect them using a local email client or delete them by logging into the web-mail directly
  • SMTP – stands for Simple Mail Transfer Protocol and is the system used when emails are SENT. It transfers the email from your out-box to the recipients in-box.
  • POP3 – stands for Post Office Protocol and is the system used by local email clients to retrieve emails from a remote web-server

If you’re using a local email client (see definitions), this is what happens when someone sends you an email:

This is what happens when someone sends you an email

This is what happens when someone sends you an email

Of course, you can log directly into your webmail account and reply to ‘Jim’ like this:
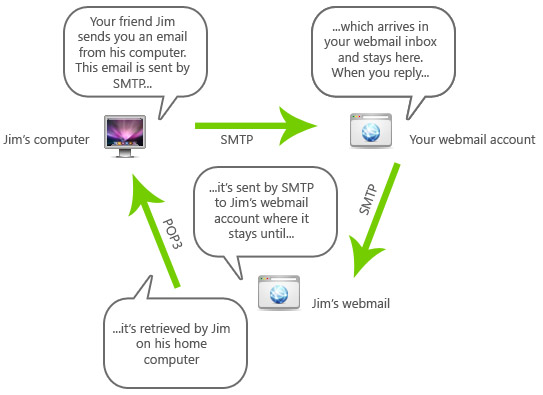
This is what happens when you reply to an email from your webmail account

This is what happens when you reply to an email from your webmail account

The problems with this system

This system works perfectly well when sending emails between computers, however, emails are commonly sent with very large attachments.

for example, Seven Creative’s email system allows you to send up-to 80 MB attachments which is obviously far too big to receive on a mobile phone or similar portable device! Firstly, portable devices tend to use the mobile network’s system for connecting to the internet which is very slow and most people are charged by the MB for this internet connection so it could be very expensive. Secondly, mobiles and portable devices are not designed for large attachments and storage is limited.

Surely, a better idea for mobile email would be to just give you a preview of the important bits of the email such as who it’s from, the text and the name of any attachments?

This is where IMAP comes in handy

IMAP stands for Internet Message Access Protocol and is used for reading mail on portable devices.

IMAP allows you to just download the message headers i.e. the title and the text. This then gives you the option of either replying, ignoring or deleteing the message (and by ‘deleting the message’ it means removing it directly from the web server without having to ever download the actual message)

The size of the header information will normally be just a few bytes so is quick and cheap to download and doesn’t take up much storage space on your portable device.

The best thing about IMAP, however, is that it never actually deletes or removes anything from the webserver unless you tell it to. This means you’ll never end up with duplicate messages or some messages on one computer and others on another, for example, you can connect to your inbox, read an email, reply to the sender and then when you get home, your email is still there on the web-server for you to download as normal

IMAP runs in parallel to your POP3 address allowing you to read emails from multiple devices while keeping them always in one place

IMAP will also work with Microsoft Exchange server, however, it really does start getting complicated then… 🙁
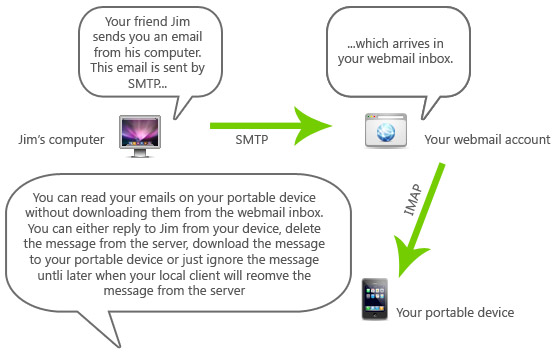
Using IMAP to read your emails on a portable device

Using IMAP to read your emails on a portable device

It’s a lot simpler than you think…

to start using your portable device to check your emails.

Let us know if you’d like to give it a go and we can supply you with IMAP and SMTP settings

Get in touch with us here
Setting up a computer from new

Emergency computer reset

Computer reset lever

I’ve just set up a new laptop for someone and thought to myself that it might be interesting to write a short list of the changes I make and the software I install during the process.

The problem with new computers these days is that they arrive pre-installed with all sorts of software you didn’t ask for and don’t need. Whilst this software more-than-likely subsidises the cost of the new computer, it’s something that I’m personally not a big fan of – it slows down your computer and there are often better free versions of this commercial software available.

The last 5 or 6 laptops I’ve bought have all been Toshiba because I like their reliability and I currently buy from Insight as their prices and service are very good (Prior to that it was eBuyer)

Insight laptops don’t tend to arrive with too much pre-installed software, unlike a certain other larger mail-order computer supplier I could mention, so it’s not too time consuming to sort out.

This particular laptop is a Toshiba running 32 bit Windows Vista Business

  1. Firstly, I connect to wireless internet (if available). If you’re installing the operating system too, XP prior to Service Pack 2 doesn’t have wireless internet support as standard so the best thing to do is download XP Service Pack 3 network install version to a flash drive (or disk) and install before you’re able to connect wirelessly. Of course, you could connect with a cable if you preferred but I find them so 1990’s
  2. Secondly, I download Google Chrome Browser and install. This browser is miles ahead of it’s nearest competitor and I don’t use anything else these days for day-to-day browsing. When installing, I set as default browser. I also install flash player browser plug-in at this time. This is something that is not essential but will probably need to be done at some time.
  3. Thirdly, I Download Revo Uninstaller free version and install. This is a great utility for removing applications from your computer as it will also remove left-over registry entries and files
  4. I download (but don’t install yet) Microsoft Security Essentials. Free software and currently, the best option for your virus and malware protection, IMO.
  5. I remove McAfee anti-virus using Revo Uninstaller.
  6. I install the Microsoft Security Essentials I downloaded earlier. Once installed, update and run the ‘quick scan’ finish installation.
  7. Run Widows Update until all updates have been installed
  8. Download and install Ccleaner. This free utility has some very useful little features that should come in handy, firstly;
  9. Run Ccleaner and navigate to Tools/Start-up. Disable or delete any items you don’t want to start-up when the computer starts
  10. Open Revo Uninstaller and uninstall and application I don’t want

This is the basic list above. Below are a few other optional steps:

  1. Install Microsoft Office. Once installed, update.
  2. Download and install Skype. Couldn’t do without this application!
  3. Download and install AL Show free version. A great little media player
  4. Download and install Bullzip PDF printer free version. Installs as a printer and allows you to create PDFs using the normal ‘print’ command

Hope this helps?

Windows keyboard short-cuts everyone should know!

There are hundreds of short-cut keyboard combinations and when you start to learn them , they can really help you save a lot of time!

Many of them are also transferable meaning, for example, some that work with MS Word may also work with Photoshop.

CTRL+C and CTRL+V are very common and widely supported short-cuts for copy and paste, but most people know these already. below, however, are a lot short-cuts you probably didn’t know!

  • CTRL+TAB – Move forward through tabs.
  • CTRL+SHIFT+TAB – Move backward through tabs.
  • TAB – Move forward through options.
  • SHIFT+TAB – Move backward through options.
  • ALT+Underlined letter – Carry out the corresponding command or select
    the corresponding option.
  • ENTER – Carry out the command for the active option or button.
  • SPACEBAR – Select or clear the check box if the active option is a check
    box.
  • Arrow keys – Select a button if the active option is a group of option
    buttons.
  • F1 – Display Help.
  • F4 – Display the items in the active list.
  • BACKSPACE – Open a folder one level up if a folder is selected in the
    Save As or Open dialog box.
  • CTRL+C – Copy.
  • CTRL+X – Cut.
  • CTRL+V – Paste.
  • CTRL+Z – Undo.
  • CTRL+Y – Redo
  • DELETE – Delete.
  • SHIFT+DELETE – Delete selected item permanently without placing the item
    in the Recycle Bin.
  • CTRL while dragging an item – Copy selected item.
  • CTRL+SHIFT while dragging an item – Create shortcut to selected item.
  • F2 – Rename selected item.
  • CTRL+RIGHT ARROW – Move the insertion point to the beginning of the next
    word.
  • CTRL+LEFT ARROW – Move the insertion point to the beginning of the
    previous word.
  • CTRL+DOWN ARROW – Move the insertion point to the beginning of the next
    paragraph.
  • CTRL+UP ARROW – Move the insertion point to the beginning of the
    previous paragraph.
  • CTRL+SHIFT with any of the arrow keys – Highlight a block of text.
  • SHIFT with any of the arrow keys – Select more than one item in a window
    or on the desktop, or select text within a document.
  • CTRL+A – Select all.
  • F3 – Search for a file or folder.
  • ALT+ENTER – View properties for the selected item.
  • ALT+F4 – Close the active item, or quit the active program.
  • ALT+Enter – Displays the properties of the selected object.
  • ALT+SPACEBAR – Opens the shortcut menu for the active window.
  • CTRL+F4 – Close the active document in programs that allow you to have
    multiple documents open simultaneously.
  • ALT+TAB – Switch between open items.
  • ALT+ESC – Cycle through items in the order they were opened.
  • F6 – Cycle through screen elements in a window or on the desktop.
  • F4 – Display the Address bar list in My Computer or Windows Explorer.
  • SHIFT+F10 – Display the shortcut menu for the selected item.
  • ALT+SPACEBAR – Display the System menu for the active window.
  • CTRL+ESC – Display the Start menu.
  • ALT+Underlined letter in a menu name – Display the corresponding menu.
  • Underlined letter in a command name on an open menu – Carry out the
    corresponding command.
  • F10 – Activate the menu bar in the active program.
  • RIGHT ARROW – Open the next menu to the right, or open a submenu.
  • LEFT ARROW – Open the next menu to the left, or close a submenu.
  • F5 – Refresh the active window.
  • BACKSPACE – View the folder one level up in My Computer or Windows
    Explorer.
  • ESC – Cancel the current task.
  • SHIFT when you insert a CD into the CD-ROM drive – Prevent the CD from
    automatically playing.
  • Windows Key – Display or hide the Start menu. Windows Key +BREAK –
    Display the System Properties dialog box.
  • Windows Key +D – Show the desktop.
  • Windows Key +M – Minimize all windows.
  • Windows Key +Shift+M – Restores minimized windows.
  • Windows Key +E – Open My Computer.
  • Windows Key +F – Search for a file or folder.
  • CTRL+ Windows Key +F – Search for computers.
  • Windows Key +F1 – Display Windows Help.
  • Windows Key + L – Lock your computer if you are connected to a network
    domain, or switch users if you are not connected to a network domain.
  • Windows Key +R – Open the Run dialog box.
  • Windows Key +U – Open Utility Manager.

Microsoft SQL Server update problem

Q. I am unable to install the Microsoft SQL Server 2005 update KB970892 on windows Vista. What should I do?

A. You’ll need to edit your registry for this one so, as ever, back everything up first. If you’re not sure what you’re doing, seek professional technical help first!

  1. In the ‘Run’ box, type in ‘regedit’ (or navigate to C:\Windows\regedit.exe)
  2. Navigate to ‘HKEY_LOCAL_MACHINE\SOFTWARE\Microsoft\Microsoft
    SQL Server\MSSQL.1\Setup\’
  3. Right-click on ‘Resume’ in the right-hand column and select ‘Modify’
  4. Change the ‘value data’ from 1 to 0 then click ‘OK’
  5. Re-boot and then re-install the update