Category Archives: Software

About software

How to disaster-proof your photos, music and important documents

A very easy way to make sure all your files are backed-up

A very easy way to make sure all your files are backed-up

You should always have at least 3 copies of your important files, the mantra says, but it’s not as simple as you’d think!

If you’ve never had a digital disaster that has meant you’ve lost something important then you’re either very savvy or very lucky as there are a whole host of potential disasters that could mean you lose something important forever.

The most common potential problem is a ‘dead’ hard drive. The ‘knock of death’ (as it’s known, referring to the clicking noises a dying hard drive makes) might give you a few hours or so notice to get everything backed-up, however, that’s a very risky position to leave yourself in!

Trying to get information back from a ‘dead’ hard drive is also very expensive and not particularly likely to work either!

Fires, floods or thefts, etc. are probably less likely but they still mean those important documents are probably gone forever.

So how do you make sure everything is backed up to the most recent version?

If you’re mitigating for the worst you’re obviously going to need an offsite copy of everything and an external hard drive seems like the logical solution, doesn’t it? The problem comes when you have to get into a routine of backing up every-day and, besides the time that would take, you still run the risk of the hard drive dying or you still not having the most recent versions of your documents.

Emailing the documents to yourself is obviously not an option due to the volume of documents and making your computer accessible outside of your office network is a very risky thing to consider!

The best solution, therefore, is a real-time, off-site, secure backup. This is where Backblaze comes in.

Backblaze is a little application that sits on your computer and constantly backs up your photos, documents and files in real-time to a secure off-site data centre.

No need to have any involvement anymore – it just happily sits there checking for new documents, photos and files and then simply transfers them to their secure off-site data centre.

And if the worst happens, simply log into their site and get your files back.

The best bit is, however, there is no limit of the amount of storage meaning you’ll never need to worry again!

I’ve been using automatic off-site backups for years and I can honestly say that Backblaze is the best in terms of price and reliability.

Backblaze is only £3.25 per month  ($5 USD) complete with unlimited backup and tools to help find your computer in the event of it being stolen.

Visit this link for more information or to try out Backblaze

How to reset your Zen Cart ecommerce admin password manually

Disclaimer and warning: manually editing your Zen Cart database runs the risk of corrupting your site and losing everything so only attempt this if you’re confident you know what you’re doing and are happy to take the risk. This tutorial is intended as a quick guide and relates for standard Zen Cart installations only. If you have any concerns or are not experienced with PHP MyAdmin, MD5 hashes or editing a database, please ask an expert to do this for you instead. We can’t be held responsible for anything that might go wrong as a result of attempting to fix this yourself.

If you’d prefer us to manually reset your Zen cart password, get in touch.

If you’re using Zen Cart and lose your password, for whatever reason, and the ‘resend password’ option isn’t working, it is possible to manually reset your password directly through the database.

Here is how you do it:

  1. Log in to your Zen Cart database using PHP MyAdmin
  2. Find the ‘admin’ table
  3. Replace the MD5 hash with the following: 351683ea4e19efe34874b501fdbf9792:9b
  4. Go back to the login page on your Zen Cart site and login again using the password ‘admin’

Once you’re logged in to your site again you’ll need to reset the password straight away to something more secure. Good luck!

More information on Zen Cart passwords

An MD5 hash is an algorithm generally to encrypt a password. This algorithm is one-way meaning you can’t de-encrypt the phrase or word from the hash.

There are, however, several openly available databases allowing you to look up an MD5 hash to find the corresponding word or phrase so this is why it’s very important to choose a complicated string when you pick your password. All the commonly occurring words and common passwords can be easily found but a password that is long, unique and complex will be almost impossible to discover.

Long, complex passwords are, however, not very user friendly for us humans so many people still decide to go against the advice and choose something simple for their password so one way to get round this problem is by using a ‘salt’

A ‘salt’ is a word or phrase that is combined with the required password to create the MD5 hash. When you log into your website, this is how the site checked you’ve entered the right password:

  1. Combines what you’ve entered in the ‘password’ field with the predefined ‘salt’
  2. Creates an MD5 hash from this combination
  3. Compares this hash with the correct password hash stored in the database
  4. Match means the password is correct

Let us know if you need any help with your Zen Cart passwords


How to factory reset your iPhone to erase all data and return to factory settings

Tutorial about how to factory reset your iPhone and erase all data (iPhone factory reset)

Tutorial about how to factory reset your iPhone and erase all data (iPhone factory reset)

If you’re planning parting company with your iPhone, for whatever reason, you’ll want to erase all the data on it and reset to factory settings. Luckily, the iPhone allows you to this very easily. Read on…

Tutorial on factory resetting your iPhone to erase all data and return to its factory settings (otherwise known as a ‘factory reset’ to erase all content and settings)

Warning: this will erase everything including photos, apps and accounts and it’s not possible to undo this. If you do choose to reset your iPhone, I would recommend making sure that everything is backup first!!!

Here goes…

  1. from your iPhone’s home-screen Go to ‘settings’
  2. Click on ‘general’
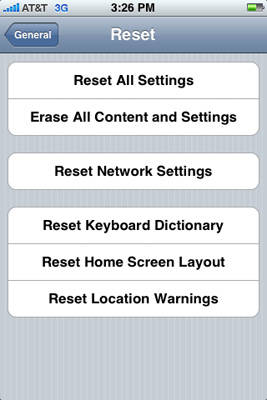
  3. At the bottom of the ‘general’ menu click on ‘reset’
  4. Click on ‘erase all content and settings’
  5. If you have a ‘passcode’ you will be prompted to enter it now
  6. Confirm the reset by clicking ‘erase iPhone’

This process may take up to 2 hours depending on the iPhone version so it may need to plugged in while you reset it

R.I.P Adobe Flash Player – August 15th 2012

Adobe Flash Player meets it's demise

Adobe Flash Player meets it’s demise

Not so long ago, the only way to have a half-decent looking animation on a website was using Adobe Flash.

Movement and interactive images could help sites engage with their customers and it was therefore a useful tool for some sites.

Because, at Seven Creative, we have always focussed on creating usable and optimised websites without sacrificing anything to ‘floweriness’, we’ve generally always avoided using Flash or, at least, only ever used it where appropriate. We could see the usefulness of the software for some niche sites, however, the negatives always outweighed any potential gains.

This is why we could see the impending end of Flash when most of the industry was still using this technology.

One of the main issues with Flash is that it can’t be read by search engines. Sites that are built this way – or even have areas like their navigation in Flash – will not index for these generally highly important site elements. Opportunities are lost as function is sacrificed to form.

One of our other main bug niggles with Flash is that you can’t edit it in the way that you can easily edit HTML using a WYSIWYG editor which is why it’s not something we would feel comfortable providing to our customers. Technology has evolved and there are newer and better methods for providing the same level of animation and interaction but with easily editable content.

Roll on a few years and Apple release their range of mobile devices that don’t support Flash. Suddenly, there are a lot of websites that won’t display properly – if at all – on some mobile devices.

This shook the industry and signalled the beginning of the end.

Android – Google’s operating system – is released and initially supported Flash, however, they’ve recently said that, from version 4.1, they’ll no longer be supporting this anachronistic technology.  So, from August 15th 2012, any Android device that does not currently have Flash Player installed will never be able to install it.

There is no doubt that other browsers will also begin to end support for this technology over the next few years.

Good news for us and our customers but bad news for the hundreds of thousands of websites out there that rely on Flash.

You might think that we’re still OK at the moment as this currently only really effects mobile devices, however, they already account for a good chunk of the visitors to most websites and this is only set to increase. This is before you get us started on the missed opportunities in search engine optimisation terms!

If you want our advice, act now. Dumping Flash might not be such a big issue for most sites and may not require a full rebuild.

If digital marketing is all about spotting and taking opportunities, seeing an opportunity and ignoring it is madness!

Short-cut to easily clear formatting from text in a Word document

Clearing formatting from a Word document

Clearing formatting from a Word document

Here is a really simple and easy way to clear formatting from text in a Microsoft Word document, for example, when you’ve cut and pasted from a website or another document

Very simply highlight the text, press and hold CTRL then press the ‘space bar’

Highlighting the text can be done easily in one of three ways:

  1. Press CTRL + A to select all
  2. place the cursor just before the text you’d like to highlight, press and hold the left-mouse button and drag the hightlighted area over the text you’d like to highlight
  3. Place the cursor at the start of the text you’d like to highlight, press and hold the ‘SHIFT’ button and use the arrow keys to move the highlighted area to the right place
Please note, if you’d like to select non-adjoining areas of text at the same time, press and hold the ‘CTRL’ key while you’re selecting text

My 3 favourite Chrome extensions (plug-ins)

Here is a list of my 3 favourite Chrome Plug-ins

  1. Hover Zoom – no need to click on that thumbnail to view it large. Simply install Hover Zoom then all you have to do is hover over the picture and you get a large version. Great for Reddit. Click here: https://bit.ly/ks6NXj

    Hover Zoom
    Hover Zoom
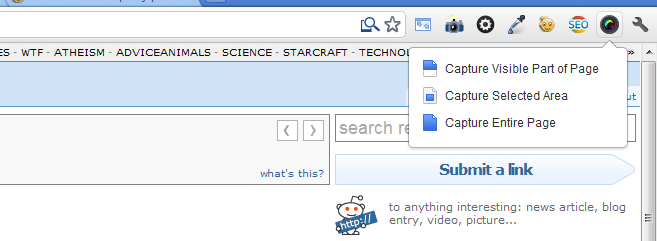
  2. Awesome Screenshot: Capture & Annotate – allows you to capture either the visible area of your screen or the full webpage. You can then annotate it. Very useful for describing  what you can see on your screen to someone else like tech support. Download it from here: https://bit.ly/jqIWEd

    Awesome Screenshot: Capture & Annotate
    Awesome Screenshot: Capture & Annotate

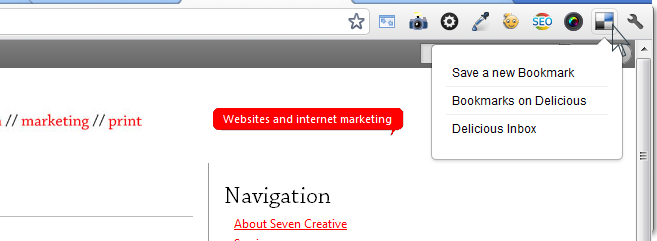
    3. Delicious Tools – sure makes adding a bookmark to Delicious a whole lot easier and quicker. Simply click the button and add the tags. Download it from here: https://bit.ly/kPPFdx

    Delicious Tools

    Delicious Tools


How to create an RSS feed from your Facebook Page or Facebook Profile


How to create an RSS feed from your Facebook Page or Facebook Profile

Here is a quick guide to creating an RSS feed (or ATOM feed) from your Facebook Group or Profile

Facebook change this sort of thing regularly, however, at the tome of writing, it is working RSS feed from a Facebook Group


  1. Go to the Facebook Group page and get the group ID. It should be in the URL as a number or query – looking something like this: id=13503181319671 – however, if you can’t see it, try clicking on the profile image to get the ID in the URL.
  2. For an RSS, put the ID it at the end of this URL after the ‘=’: https://www.facebook.com/feeds/page.php?format=rss20&id=
  3. For an ATOM feed, put the ID at the end of this URL after the ‘=’: https://www.facebook.com/feeds/page.php?format=atom10&id=

You should now be able to receive the status update via an RSS or ATOM feed

To get an RSS feed of the notifications from your Facebook Profile:

Log into Facebook

  1. Go to https://www.facebook.com/notifications.php
  2. Click the RSS feed button at the top which will give you a URL looking something like this: https://www.facebook.com/feeds/notifications.php?id=<your profile ID here>&viewer=623861399&key=69891f07ce&format=rss20


Instructions about how to back up and export webmail emails from Horde


Instructions about how to back up and export webmail emails from Horde

Instructions about how to back up and export webmail emails from Horde

Instructions about how to back up and export webmail emails from Horde

If you’re using Horde to manage your webmail emails and want to back them up, you may have realised that it seems to be not as easy to do as you’d hope without going through and forwarding email groups individually

Fortunately, it is actually pretty simple if you know how to do it and here’s how:

  1. Click on ‘mail’ on the left menu
  2. Click on ‘folders’ from the top menu
  3. Tick the boxes of the folders you’d like to export
  4. From the drop-down box ‘actions’ select ‘download’

This will download your emails in an ‘MBOX’ container file format

Alternatively, if you want to forward your messages in groups; view the emails you’d like to forward, tick the box next to them and then click on ‘forward’ which should be just above the top email

Horde

Horde

HTC Desire HD crashing when making calls

HTC Desire HD crashes when making calls

HTC Desire HD crashes when making calls

If you’re one of the lucky ones with a new HTC Desire HD phone you may have noticed there is a rather annoying bug related to the proximity sensor.

Basically, you make a call and the screen immediately turns off and becomes unresponsive

It seems like the phone has crashed but it continues to stay connected and make the call. None of the buttons work such as the ‘home’ button and the only way to ‘wake up’ the phone is to plug in a 3.5mm jack to wake the screen up or just take the battery out

In the longer term, you should update the software. To do this, connect to a WI-FI network then:

Go to ‘Applications’ > ‘settings’ > ‘about phone’ > ‘System software updates’

‘Check now’ for updates then install any available software updates.

The phone will download and install the update then restart after a few minutes.

Toshiba laptop built-in webcam problems

Toshiba laptop built-in webcam problems

Problem: Toshiba laptop Camera Assistant Software on Vista (or similar) is no longer working. When you try to run the application you get an error along the lines of:

‘Access violation at address … in module ‘CEC_MAIN.exe’. Read of address …’

‘Cannot open file C:\Program Files\Camera Assistant Software for Toshiba\NewSkin1\active.bmp’

This is a problem that only applies to a small amount of people but it’s one that is also difficult to fix as most of the information you’ll find from a Google search is confusing.

As always, make sure that you have backed your computer up etc. before attempting any of the solutions listed here. If you’re unsure about your abilities, please get an expert to do it for you. Also, I can’t guarantee that anything here will work as it uses third party software.

  1. Re-install the webcam drivers: Open ‘Control Panel’ and go to ‘System’ then ‘Device Manager’.
  2. Under ‘Imaging devices’, right-click ‘Chicony USB 2.0 Camera’ and select ‘Update driver software’.
  3. Select ‘Browse my computer for driver software’ then ‘let em pick from a list of device drivers installed on my computer’.
  4. Select ‘USB video device’ then click next.

This will re-install the drivers on your computer.

If this doesn’t work, try re-installing the Chicony Camera Assistant software:

  1. Download the Camera Assistant Software from the Toshiba website: https://bds.tjpntuw.updates.toshiba.com/Downloads/Production/tjpntuw/2009/10/03/035225_20.24.43.TC40054600D.exe
  2. Install the software and then you may need to reboot (don’t forget to bookmark this page first if you need to 🙂

Everything should be working again now 🙂