Tag Archives: Tutorial

How to take a screen capture and send it by email

This tutorial is about taking a shot of your computer screen and sending it – very useful when asking for technical support by email. This assumes you are using a PC and a local email client such as Outlook.

  1. Get whatever it is you’d like to get a screen capture of up on your screen
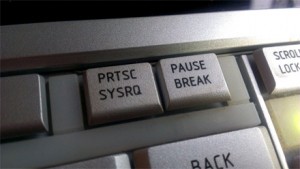
  2. Press the ‘PRTSC’ button. This is short for ‘Print Screen’ and will take a snapshot of your computer screen before sending it. Note: if you’re sending a screen capture of a website, you can press F11 to go full screen before taking the capture (press F11 again to exit full screen mode)

    PRTSC - press to take a screen capture

    PRTSC – press to take a screen capture

  3. Open your email client and open a new email
  4. With the cursor in the body of the email at the appropriate place, press and hold ‘CTRL’ then press ‘v’ once. This will paste the screen capture from your clipboard into the email.
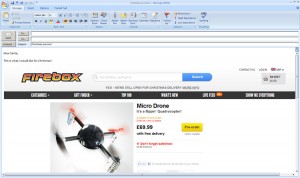
    Insert screen capture into your email

    Insert screen capture into your email

How to factory reset your iPhone to erase all data and return to factory settings

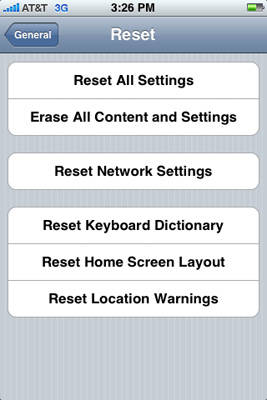
Tutorial about how to factory reset your iPhone and erase all data (iPhone factory reset)

Tutorial about how to factory reset your iPhone and erase all data (iPhone factory reset)

If you’re planning parting company with your iPhone, for whatever reason, you’ll want to erase all the data on it and reset to factory settings. Luckily, the iPhone allows you to this very easily. Read on…

Tutorial on factory resetting your iPhone to erase all data and return to its factory settings (otherwise known as a ‘factory reset’ to erase all content and settings)

Warning: this will erase everything including photos, apps and accounts and it’s not possible to undo this. If you do choose to reset your iPhone, I would recommend making sure that everything is backup first!!!

Here goes…

  1. from your iPhone’s home-screen Go to ‘settings’
  2. Click on ‘general’
  3. At the bottom of the ‘general’ menu click on ‘reset’
  4. Click on ‘erase all content and settings’
  5. If you have a ‘passcode’ you will be prompted to enter it now
  6. Confirm the reset by clicking ‘erase iPhone’

This process may take up to 2 hours depending on the iPhone version so it may need to plugged in while you reset it

Updating your password in Outlook 2010 tutorial

It is very simple to update your email collection (POP3) password in Outlook 2010 by following the steps below:

  1. Open Outlook
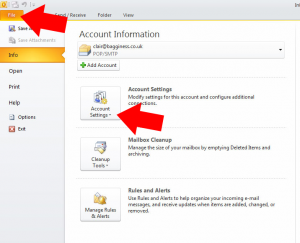
  2. Click on the ‘File’ option at the top of the page
  3. you’ll now have an option for ‘account settings’ – click here

    Open Outlook 2010, click 'file' option at the top of the screen, then click on 'account settings'

    Open Outlook 2010, click ‘file’ option at the top of the screen, then click on ‘account settings’

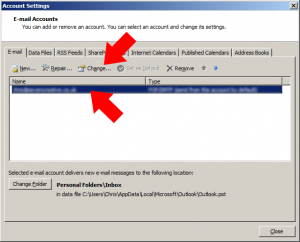
  4. click on the account you’d like to change then select ‘change’

    Click on the email account you's like to change then select 'change'

    Click on the email account you’s like to change then select ‘change’

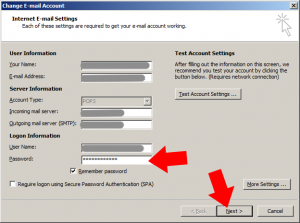
  5. from the ‘account settings page, type in your new password in the ‘password’ box

    From the 'account settings' page, type in your new password into the 'password' box then press 'next'

    From the ‘account settings’ page, type in your new password into the ‘password’ box then press ‘next’

  6. click ‘next’
  7. click ‘finish’

Short-cut to easily clear formatting from text in a Word document

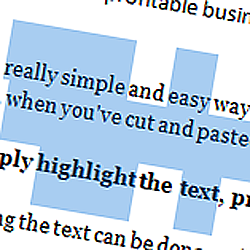
Clearing formatting from a Word document

Clearing formatting from a Word document

Here is a really simple and easy way to clear formatting from text in a Microsoft Word document, for example, when you’ve cut and pasted from a website or another document

Very simply highlight the text, press and hold CTRL then press the ‘space bar’

Highlighting the text can be done easily in one of three ways:

  1. Press CTRL + A to select all
  2. place the cursor just before the text you’d like to highlight, press and hold the left-mouse button and drag the hightlighted area over the text you’d like to highlight
  3. Place the cursor at the start of the text you’d like to highlight, press and hold the ‘SHIFT’ button and use the arrow keys to move the highlighted area to the right place
Please note, if you’d like to select non-adjoining areas of text at the same time, press and hold the ‘CTRL’ key while you’re selecting text

Outlook 2007 – adding SMTP authentication

When using a laptop or mobile device, you’re potentially going to be sending emails over many different internet networks. In order to make sure that only the allowed users are using a particular SMTP to send email, they commonly require a user-name and password to log into the SMTP server every time an email is sent. This is not something you’d normally notice as your computer should do this automatically in the background, however, if that authentication fails, you’ll not be able to send emails

If your outgoing email server on Outlook 2007  requires authentication, use the following steps to add the user-name and password:

  1. Open Outlook
  2. Click the ‘tools’ tab from the top menu then click ‘account settings’
  3. Highlight the account you’d like to edit then select ‘change’
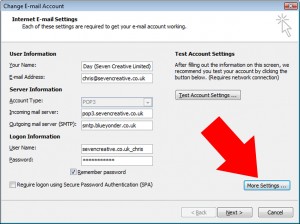
  4. On the internet e-mail settings page click ‘more settings’

    On the internet e-mail settings page click ‘more settings’

    On the internet e-mail settings page click ‘more settings’

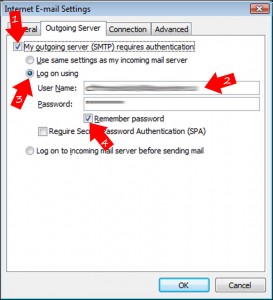
  5. On the new window, click the ‘outgoing server’ tab

    On the new window, click the ‘outgoing server’ tab

    On the new window, click the ‘outgoing server’ tab

  6. Change the following settings:
    1. Tick the box ‘my outgoing server requires authentication’
    2. Tick the ‘log on using’ button
    3. Type in your normal username and password
    4. Tick the ‘remember password’ button
  7. Click ‘OK’ which will take you back to the main ‘email settings’ page
  8. Click ‘next’
  9. Click ‘finish’

553 sorry, that address is not in my list of allowed recipients email problem


553 sorry, that address is not in my list of allowed recipients email problem

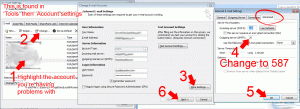
if you’re regularly getting emails bounced back to you with the error ‘553 sorry, that address is not in my list of allowed recipients’ this might help.

In our experience, the problem is usually down to a BT issue not allowing emails to be delivered.

If you’re using a BT internet connection and Outlook to send your mail, try this (click on the image for larger version):

Fix the 'address not on my list of allowed recipients' problem using Outlook

Fix the 'address not on my list of allowed recipients' problem using Outlook

How to create an outlook email template

How to create an outlook email template

If you use Outlook and often have to write similar emails, Instead of re-writing them every time it might be a better idea to create a template.

This is very simple to do and might save you a lot of time! Here’s how to do it:

  1. Write your email as normal including subject and content
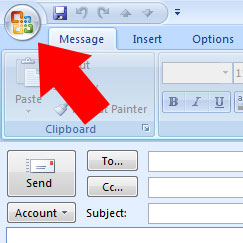
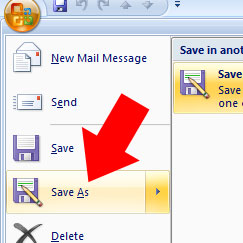
  2. Click the Outlook button and choose ‘save as’
  3. Click the Outlook button

    Click the Outlook button

  4. When the save dialogue box appears, save the message on your computer.
  5. Choose 'save as' from the drop down menu

    Choose 'save as' from the drop down menu

Now, when you want to use your template, just double click the saved email and you can use as many times as you like