 A note from the editor
The year seems to be flying by – I have no idea where January went which is worrying as I’ve not touched anything stronger that Horlicks since New Years Eve! As I write this we’re already over a ninth of the way through the year with only 271 shopping days left until Christmas so it must be that it’s all-systems-go here at Seven Creative Acres – our diversification and sales push seems to be working a treat and we’re busier than we’ve ever been!
In the news at the moment, Toyota’s recall of the 2010 Prius along with 2 other hybrid models comes on top of 2.3 million cars already recalled has sent their share price plummeting. The prognosis, however, looks quite good. From all accounts, Toyota will survive this crisis and, no doubt, will emerge stronger than ever. They may have initially expanded too quickly, however, they were perfectly placed to weather this particular storm. What can we learn from this? Toyota concentrated on quality and reputation and built a brand towards which consumers feel loyalty and trust. The words ‘quality’ and ‘reputation’ sometimes seem anachronistic these days in a world of cut-throat business, however, they have served Toyota well and the company will undoubtedly remain as successful as they ever were.
In this issue
- Who owns the intellectual property rights to your website?
- Ever accidently deleted an important file?
- What is Conversion Rate Optimisation?
- Which browser do you use?
- Domain name maketh the site – when to use a hyphen
- What is a .DOCX or .XLSX?
- Promote your website for free
Intellectual property rights – a word of warning
When we produce any kind of design work for our customers, from websites to leaflets, we automatically transfer the intellectual property rights of the work to the customer upon final payment. This is something we believe to be fair, ethical and is clearly outlined in our terms and conditions. If one of our customers decides they’d like to take the artwork elsewhere in the future, they’re free to do so. This also applies to domain names, photography, logos etc.
You would be forgiven for assuming that this was just standard practice in our industry. However, we’ve recently taken on a new customer who has been very poorly treated by her previous design company:
When she decided she wanted to upgrade her website she approached us and we presented a proposal, which was accepted. She then approached her previous design company to inform them of this and to request administrative control of her domain name and her website files in order to allow us to move the hosting and upgrade her site. She was shocked with the response. The company abruptly informed her that the website, its content and all the imagery and design belonged to them and was further informed by them that if she used any elements of the site without their permission, she would face legal action.
Luckily, the domain had been registered in her name so we were able to transfer administrative control directly. If this had not been the case, this would have also been lost.
This, in our opinion, is totally unethical but just goes to show that unless you have these issues clearly outlined when you enter into a contract, you may have no rights to your website or artwork if things turn sour!
We would like to point out, however, that, in our opinion, commissioning a bespoke design (rather than the purchase of template artwork) would infer IP transfer at the point of completion. A commission, by its very nature, is a piece of work undertaken for you. Imagine having a portrait painted and then the artist telling you it always belongs to them! On a day in court, I think she would have won, but who wants the stress and expense in undertaking this?
Obviously, we’ll not be mentioning our new customers’ name, but the company who treated her so badly, on the other hand, were ‘webworksinternet.com’. If this is the type of service they provide to their customers, I’d avoid them like the plague.
Recovering deleted files
 I have a little free application installed on my computer that I use surprisingly often to recover ‘permanently’ deleted files. The trouble with installing an application like this after you’ve deleted that important file is that there is a good chance you’ll overwrite it and therefore properly permanently delete it.
Recuva by Piriform is a compact and intuitive application that scans your hard drive for deleted files and allows you to restore the files it finds. The application is free and takes up no system resources until you actually need it. I’ve used it and would recommend it to anyone who might be in a position where they need to recover an important document that has been accidently deleted at some point.
Download it from the Piriform website: https://www.piriform.com/recuva/download/standard
Conversion rate optimisation
Conversion Rate Optimisation is probably not a phrase you’re currently familiar with. However, it is something you’ll undoubtedly come across at some point if you start optimising your website. Basically, the difference between a ‘sale’ and ‘no sale’ can be, for example, down to the colour or font of your ‘buy now’ button. Making small adjustments and monitoring how it influences your conversion rate allows you to optimise the look, feel, layout and content of your website which will ultimately mean your site provides you with a better ROI.
A design decision, even when based on years of experience, is sometimes still just a ‘best guess’ but conversion rate optimisation will help you to make decisions based on real usage data
Browser comparison
 Sometimes is seems that Microsoft’s Internet Explorer is never out of the news – security holes, urgent updates, compatibility issues and downing street petitions to phase out Internet Explorer 6 to name a few – and, more recently, even the German Government warned web users to use a different browser to protect security!
Internet Explorer is the most widely used browser, but is it the best? I stopped using it several months ago due to the unreliability and clunkiness of the browser. Obviously, due to the nature of my work I have to test websites on all the main browsers. However, internet explorer began to become more of a liability than something to actually facilitate my work.
When Chrome came along, I discovered a light-weight and fast browser, which speeds up my online experience and proves to be extremely reliable. Chrome is the free browser provided by Google and has already rocketed in popularity since its release in late 2008.
I personally find Mozilla Firefox to be slow, heavy and clunky – not a great deal different to IE. Safari, on the other hand, is less buggy, however, I’m used to the Miscrosoft shortcuts which don’t always tally up with the Apple browser.
If you’ve not tried Chrome, why not give it a go? It’s changed my online experience for the better and shown there is a better way to do it. I don’t think I’ll ever use IE as my primary browser again!
Choosing a domain name – when to hyphenate
As more and more of the best domains are registered it becomes harder to get the right one. Many people will initially consider compromise or shortening their business name, however, this may not always be the best solution.
Something which is not always considered is the humble hyphen. Did you know it can often help your visitors or potential customers find you as the hyphen often breaks up a string of letters into readable words. One of the most high-profile examples is the National Lottery. Their domain name ‘national-lottery’ is easier to read than with the hyphen than without: nationallottery.
Another issue to consider is from the search engines point of view. A search engine will match a search term against a domain name without prejudice, or to put it another way, if your domain name contains words that have been formed by putting other words next to each other, the search engine will match them.
One of the most infamous examples of this is the Mole Station Nursery. Originally, a perfectly innocent website for a genuine nursery based in New South Wales, they quickly became famous on the internet when someone pointed out their domain name implied something else: molestationnursery.com
This example is an extreme one. However, it shows that this nursery could have avoided any embarrassment with a humble hyphen or two to break up the words.
Just for a bit of fun, here are some other famous examples of domain names that could have benefited from a hyphen:
- Experts Exchange – expertsexchange.com
- Therapist Finder – therapistfinder.com
- Powergen Italia – powergenitalia.com
- Pen Island – penisland.net
- Who Represents – whorepresents.com
What are DOCX / XLSX?
 If you’ve ever come across a file with a .docx or .xlsx extension and not known what to do with it, read on.
Microsoft’s Office 2007 brought many changes including new file extensions for Excel 2007 and Word 2007 documents. Whereas Office 2003 documents are forwards compatible with Office 2007, the 2007 documents are not compatible with the 2003 version or prior versions and this is where the problem lies.
The cynical amongst us may speculate that this may have been done to encourage Office users to upgrade to the latest version, however, this isn’t actually necessary.
Not many people know this, but there is a compatibility patch you can apply to MS Word 2003 and Excel to allow you to open the 2007 version documents and use them as normal.
More information and download available from here: https://office.microsoft.com/en-us/products/ha101686761033.aspx
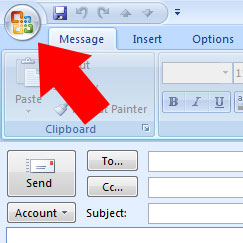
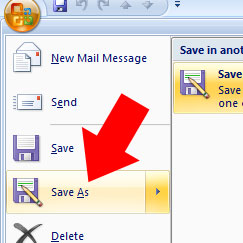
If you’re using Office 2007 and you’d like to save a document in the older format meaning it will be compatible with 1997, 2000 and 2003 versions of Office, simply click on the top-right windows button, select ‘save as’ from the drop down menu then select Word 97-2003 document.
Promote your business for free
Inbound website links are one of the most important elements when it comes to Search engine optimisation. Of the different types of inbound links you can have, direct, on-way contextual links are brilliant when it comes to helping your site index well with search engines and driving traffic to your site and we’re giving them away for free! If you’re a customer or friend of Seven Creative / Seven Website Design, simply write a title and paragraph about your business and send it to us and we’ll put you direct a link on the Seven Creative Blog. Simple as that! No strings, no cost. Give us a call if you want more information
…and finally
This brings us to the end of another newsletter. If you’re still with us; congrats. 1800 words is quite a pile to plough through! To reward you for your dedication, I’d like to leave you with a final thought:
“Whenever I see a man with a beard, moustache and glasses, I think, ‘There’s a man who has taken every precaution to avoid people doodling on photographs of him” – Carey Marx
Wishing you a continuing happy, successful and prosperous 2010 – Chris and the Seven Creative team


 A note from the editor

