Category Archives: Tutorial

How to format your HTC Desire HD

HTC Desire HD factory reset

HTC Desire HD factory reset

The following steps show you how to hard reset or factory reset your HTC Desire HD

This is pretty self explanatory. Remember that this will wipe the phone so make sure that you have backed up everything you want to keep first!

Here goes:


  1. Turn off your phone.
  2. With the phone turned off, press and hold the VOLUME DOWN button, and then briefly press the POWER button.
  3. Wait for the screen with the three Android images to appear, and then release the VOLUME DOWN button.
  4. Press VOLUME DOWN to select CLEAR STORAGE, and then press POWER.
  5. Press VOLUME UP to start the factory reset.

How to format your Nokia 5800 mobile phone


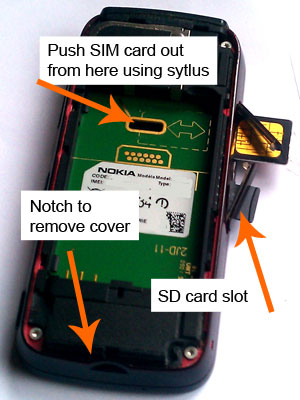
How to remove back cover, SIM card and SD card from Nokia 5800

How to remove back cover, SIM card and SD card from Nokia 5800

When it’s time to upgrade to a new phone it’s important to delete the information on your old one to help keep your private information such as email addresses and contacts safe

To format your phone and delete all the information in the memory there are two options.

The first should work for most recent Nokia phones:

1. Dial *#7370#
2. Type in your lock code. The default number is 12345. (If you’ve changed this number and forgotten the new one, this format
method won’t help)

the phone will restart back to the original out-of-the-box settings and your information will be wiped.

The second method works with the Nokia 5800 V. 20.0.012

1. Turn your phone off
2. Press power button to turn on
3. As the phone starts booting up, hold down the red and green buttons on the front together with the camera button on the side.
You’ll still need your lock code for this method

Once restored to factory settings, don’t forget to remove your SD card and SIM.

To remove the SIM and SD card:

1. Take off the back cover by putting your thumbnail in the notch on the back at the bottom and pulling backwards away from the phone. The back cover will open like a book as opposed to sliding open
2. Take out the battery
3. Open the side access doors (they’re on the left-had side as your looking at the phone from the front
4. Push out the SIM card by putting the stylus into the hole under the battery compartment
5. Push the SD card in with your nail or the stylus and it will pop out

It should now be ready to pass on

How to view and disable HTC start-up processes

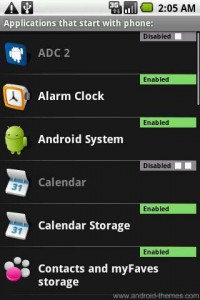
Startup Auditor allows you to view and disable your HTC start-up processes

Startup Auditor allows you to view and disable your HTC start-up processes

When you boot your HTC phone with Andriod operating system, it’s a fair bet that you’ll have a whole load of applications starting that you don’t need or want to run.

There is, however, a very simple and quick application that allows you to disable start-up processes very easily.

Simply download ‘Startup Auditor’ and install. You will now be able to choose which applications start-up when your phone boots.

The software has a trial version with ads (and other restrictions) but the paid-for version also has a trial period. To buy it costs around 63p (at the time of writing)

HTC Desire HD crashing when making calls

HTC Desire HD crashes when making calls

HTC Desire HD crashes when making calls

If you’re one of the lucky ones with a new HTC Desire HD phone you may have noticed there is a rather annoying bug related to the proximity sensor.

Basically, you make a call and the screen immediately turns off and becomes unresponsive

It seems like the phone has crashed but it continues to stay connected and make the call. None of the buttons work such as the ‘home’ button and the only way to ‘wake up’ the phone is to plug in a 3.5mm jack to wake the screen up or just take the battery out

In the longer term, you should update the software. To do this, connect to a WI-FI network then:

Go to ‘Applications’ > ‘settings’ > ‘about phone’ > ‘System software updates’

‘Check now’ for updates then install any available software updates.

The phone will download and install the update then restart after a few minutes.

How to speed up Vista instantly

How to speed up Vista instantly

If you’re using Vista, you may have noticed how heavy it is in hardware-resource terms.

If you’d like a faster computer and are prepared to compromise on the aesthetics, here is a very simple and quick way to get things moving more quickly. This method will also give you the reassurance of knowing that you can undo any changes you make by following the same instructions:

  1. Click on the windows button at the bottom left of the screen
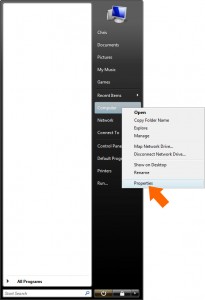
  2. Right-click on ‘Computer’ in the right-hand column on the start menu
  3. Select ‘properties’ from the new pop-up menu

    Click the Windows button then right-click 'Computer' and select 'properties'

    Click the Windows button then right-click 'Computer' and select 'properties'

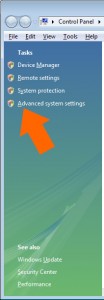
  4. From the new ‘system’ window select ‘advanced system settings’ from the left-hand column

    Select advanced settings from the left-hand column

    Select advanced settings from the left-hand column

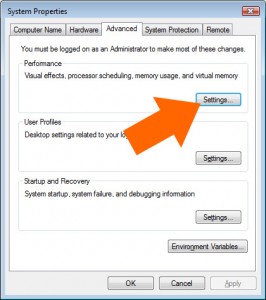
  5. From the new system properties window select the third tab labelled ‘Advanced’

    From the new system properties window select the third tab labelled ‘Advanced’. Select the ‘settings’ button under ‘performance’

    From the new system properties window select the third tab labelled ‘Advanced’. Select the ‘settings’ button under ‘performance’

  6. Select the ‘settings’ button under ‘performance’
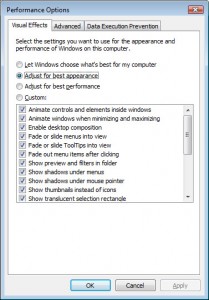
  7. From the new window, under the ‘visual effects’ tab, you now have the options to:
  • ‘Let Windows choose what is best for my computer
  • ‘Adjust for best appearance’
  • ‘Adjust for best performance’
  • Or select the options individually yourself (‘Custom’)
Choose your performance options

Choose your performance options

Select the ‘Adjust for best performance’ then click OK. This may take a few moments while your computer applies the new settings. To revert to the original or default settings, follow the same instructions above but choose option ‘b’ in step 7

Convert text to lower-case, upper-case or capitalised the easy way!

CAPS-LOCK

CAPS-LOCK = SHOUTING

This tutorial is specifically for Microsoft Word and Outlook, however, as with many keyboard shortcuts, they’ll often be supported by many other applications

Ever accidentally hit the CAPS LOCK button and written a whole paragraph in capitals? Or how about got one of those shouty emails all in caps that are difficult to read?

Good news – there is an ultra-simple way to swap between capitals and lowercase! It’ll even capitalise the starts of paragraphs for you!

Simply, highlight the offending text, hold down ‘SHIFT’ and press ‘F3’. That’s it!

In Outlook, you’ll have to click reply or forward first to make the text area editable but it still works!

Very handy!