Category Archives: Email

How to find your email signature folder in Outlook

…and how to edit it

If you use Outlook to send and receive emails, you’re probably also using the ’email signature’ facility that allows you to create a custom bit of text and images that appears at the end of the emails you write.

The problem is, the in-built email signature editor in Outlook is very basic! If you want to create something a bit more complex, sometimes the only option is to do it manually.

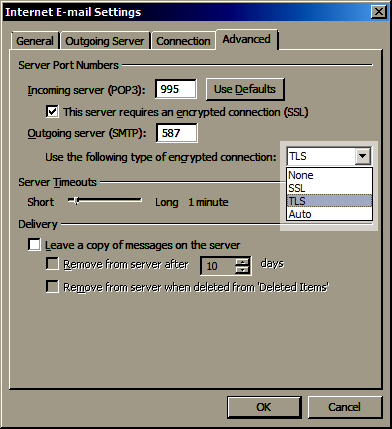
Each email signature is made up of three files – signature.rft, signature.html, and signature.txt. These are three different versions of the same signature but used for different types of emails, for example, plain text or rich text. (Note: where I’ve used the word ‘signature’ in the file names in this paragraph, for your email signature, it will be whatever you have named it e.g. ‘My Email Sig.txt’)

Together with these three files there is usually also a directory (aka folder) which contains the corresponding images.

If you can find these files, edit them manually, and save them as they are, you’ll be able to do a lot more in terms of layout and functionality than if you’re just editing these through the Outlook email signature editor.

Firstly, create the files (the signatures folder is created when the first email signature is saved):

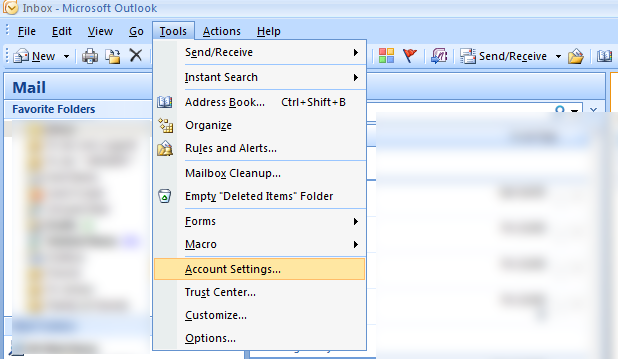
  1. Open Outlook, click the ‘tools’ option from the top row of options, then click ‘options’ from the drop-down menu
  2. From the ‘Options’ dialogue box that pops up, click the ‘mail format’ tab then click ‘signatures’
  3. from within the ‘Signatures and stationery’ dialogue box, click ‘new’, give it a name, then press OK then save.
from within the 'Signatures and stationery' dialogue box, click 'new', give it a name, then press OK then save.

from within the ‘Signatures and stationery’ dialogue box, click ‘new’, give it a name, then press OK then save.

Now to edit the files:
To find these files we’ve just created:

  1. Go to file explorer – either press ‘Windows key’ + E or go to my computer
  2. Type ‘%APPDATA%’ (without the quotes) into the address bar at the top and press enter or from My Computer navigate from C: to ‘Users’, ‘Your user name’, ‘appdata’
  3. from ‘appdata’ click on ‘Microsoft’ then ‘signatures’ (please note this folder won’t exists until you’ve created your first email signature through Outlook)
Open the file explorer, and type '%APPDATA%' (without the quotes) into the address bar at the top then press enter

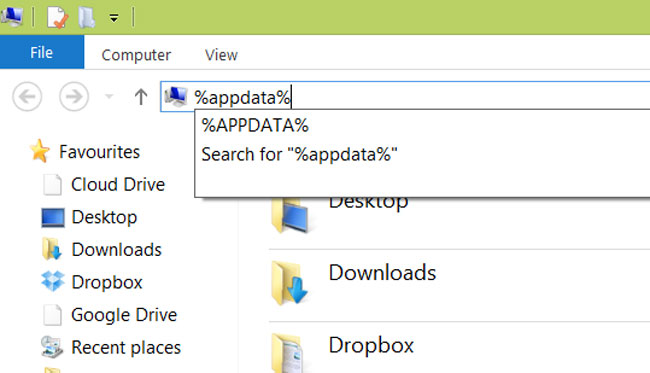
Open the file explorer, and type ‘%APPDATA%’ (without the quotes) into the address bar at the top then press enter

Go to file explorer - either press 'Windows key' + E or go to my computer

Go to file explorer – either press ‘Windows key’ + E or go to my computer

  • The text file can be easily edited using Notepad or similar. This is the signature that is included when the mail format is ‘plain text’ meaning you can’t have any pictures included and you have limited control over formatting and fonts.
  • The HTML file can be edited using Notepad if you know HTML, or alternatively, you may need a visual HTML editor to make changes.
  • The RTF file can be edited using MS Word or similar. The RTF anf HTML files are included when you send your email in rich text format
  • Don’t forget to stick to the hyperlink format and include any images you include in the respective folder within the signatures folder

How do I change my Outlook email account to use SSL?

SSL is an encryption method for sending emails and will help avoid the emails you send being seen by unintended recipients.

It stands for Secure Socket Layer and this quick tutorial will show you how to configure Outlook to send using the SSL method.

The example below uses Outlook 2007, however, this will still apply to similar version of this email client.

Remember, making changes to your Outlook settings may result in you not being able to collect or send email any more so if you’re not 100% sure what you’re doing, please get help from an expert

1. Open Outlook

2. Select ‘Tools’ then ‘Account settings’

Select 'Tools' then 'Account settings'

Select ‘Tools’ then ‘Account settings’

3. Highlight the email account you need to change and press the ‘change’ button

Highlight the email account you need to change and press the 'change' button

Highlight the email account you need to change and press the ‘change’ button

4. Select ‘more settings’

Select 'more settings'

Select ‘more settings’

5. From the ‘Internet email settings’ dialogue box, select the ‘advanced’ tab

From the 'Internet email settings' dialogue box, select the 'advanced' tab

From the ‘Internet email settings’ dialogue box, select the ‘advanced’ tab

6. Tick the box that says ”the server requires an encrypted connection’

 Tick the box that says ''the server requires an encrypted connection'

Tick the box that says ”the server requires an encrypted connection’

7. Choose your required type of encryption from the drop-down box

Choose your required type of encryption from the drop-down box

Choose your required type of encryption from the drop-down box

8. Click ‘OK’ then ‘next’ on the ‘Internet email settings’ page, then ‘finish’

9. If your email account is not able to send emails, follow the steps 1 to 5 again then try changing your incoming port to 995 and your Outgoing port to 587, then step 8. If this doesn’t work you can follow steps 1 to 5 then select ‘restore defaults’, then step 8

If your email account is not able to send emails, follow the steps 1 to 5 again then try changing your incoming port to 995 and your Outgoing port to 587, then step 8. If this doesn't work you can follow steps 1 to 5 then select 'restore defaults', then step 8

If your email account is not able to send emails, follow the steps 1 to 5 again then try changing your incoming port to 995 and your Outgoing port to 587, then step 8. If this doesn’t work you can follow steps 1 to 5 then select ‘restore defaults’, then step 8

How to take a screen capture and send it by email

This tutorial is about taking a shot of your computer screen and sending it – very useful when asking for technical support by email. This assumes you are using a PC and a local email client such as Outlook.

  1. Get whatever it is you’d like to get a screen capture of up on your screen
  2. Press the ‘PRTSC’ button. This is short for ‘Print Screen’ and will take a snapshot of your computer screen before sending it. Note: if you’re sending a screen capture of a website, you can press F11 to go full screen before taking the capture (press F11 again to exit full screen mode)

    PRTSC - press to take a screen capture

    PRTSC – press to take a screen capture

  3. Open your email client and open a new email
  4. With the cursor in the body of the email at the appropriate place, press and hold ‘CTRL’ then press ‘v’ once. This will paste the screen capture from your clipboard into the email.

    Insert screen capture into your email

    Insert screen capture into your email

553 sorry, that address is not in my list of allowed recipients email problem


553 sorry, that address is not in my list of allowed recipients email problem

if you’re regularly getting emails bounced back to you with the error ‘553 sorry, that address is not in my list of allowed recipients’ this might help.

In our experience, the problem is usually down to a BT issue not allowing emails to be delivered.

If you’re using a BT internet connection and Outlook to send your mail, try this (click on the image for larger version):

Fix the 'address not on my list of allowed recipients' problem using Outlook

Fix the 'address not on my list of allowed recipients' problem using Outlook

Phishing emails – tell-tale signs it’s not from who it says it’s from

Emails aren't always from who they say they're from!

Emails aren't always from who they say they're from!

I’ve just received quite an ingenious phishing email… well it’s slightly more intelligently conceived and implemented than the usual type

Yesterday I made an order on Amazon and today I get an email, pertaining to be from Amazon, telling me that my order has been cancelled!

Firstly, even though I’m sure that me receiving an Amazon order cancellation the day after making an order with them is purely coincidence, for me, as for many other people, Amazon account for the majority of everything I personally spend online so the chances of me having made a recent purchase are pretty high. Anyway, even if I hadn’t, my first reaction would have been ‘has my account been hacked?’ so I would have wanted to find out.

Secondly, it’s perfectly within the realms of possibilities that an order may have been cancelled –cards get stopped, vendors run out of stock… there are numerous reasons for this so you’d have no reason to, on first glance, assume that the email was legitimate.

Thirdly, the spelling and grammar was correct. On the one hand it amazes me have many grammatical mistakes there are in the average phishing email. I’m sure some of these are to avoid detection by spam filters but many other are simple mistakes that even pasting the text into Google or Word would fix. On the other hand, anyone stupid or foolhardy enough to think that to conduct a phishing campaign is a good idea can’t be the sharpest of twigs!

There are some massive tell-tale signs, though, that this email is not from who it says it’s from!

The one that first alerted me was that Amazon don’t send account and order notifications in that format using that font. If you’re on their mailing list, you’ll no doubt get your ‘deals of the week’ in rich text but everything else pertaining to your account is in a pretty standard format – order confirmations, despatch notes, etc. – will be standard format. I wouldn’t be surprised if the person who sent this email had never ordered anything from Amazon!

The other this I always do is check the domain within the links. This one wasn’t Amazon so I wasn’t clicking it

You can also use your common sense and examine the email a bit more closely. I have 8 email account sI use through Outlook and many of these are catch-all addresses. I only, however, have one email address registered with Amazon. If I get an email pertaining to be from Amazon to an email address I haven’t got registered with them, I know it’s probably not legitimate.

The advice is as always; if you get an email asking you to click on a link to go to a site; don’t do it. If you’re not sure, open your browser and go directly to the website. Log in there and then check your messages or account status directly.